This guide will show you how to connect your Nintedo Wii to the Internet.
In order to connect your Nintendo Wii to the internet you will need either a wireless router or if you do not own a wireless router, you can also purchase the Nintendo Wi-Fi USB Connector. This add-on device connects to the USB port on your PC to create a wireless access point. This guide deals with how to connect a Nintendo wii to the internet with a wireless router though the technique is similar if you choose to purchase the USB Connector.
You will also need a compatible broadband Internet connection with either cable, DSL, or Fiber Optic.Dial-Up, Satellite, Cellular modems (Cell Phones), EV-DO connections are not compatible.
Depending on what kind of seciruty settings your router has you will be able to skip some of these steps but for those who can't I will start at the beginning.
First Determine what kind of security settings your router has. Some routers might need a WEP password in order for a device to connect it. Some a WPA or WPA2 password and some none at all. Talk to the person who set your router up if you are not sure. Some routers also have an access list. This means the MAC address of any device that wants to connect to it needs to be entered into it's settings and given permission to connect to it. A MAC address is like the license plate of a car.
You will also need a compatible broadband Internet connection with either cable, DSL, or Fiber Optic.
Depending on what kind of seciruty settings your router has you will be able to skip some of these steps but for those who can't I will start at the beginning.
First Determine what kind of security settings your router has. Some routers might need a WEP password in order for a device to connect it. Some a WPA or WPA2 password and some none at all. Talk to the person who set your router up if you are not sure. Some routers also have an access list. This means the MAC address of any device that wants to connect to it needs to be entered into it's settings and given permission to connect to it. A MAC address is like the license plate of a car.
Here is how to find the MAC addess of your Nintendo Wii:
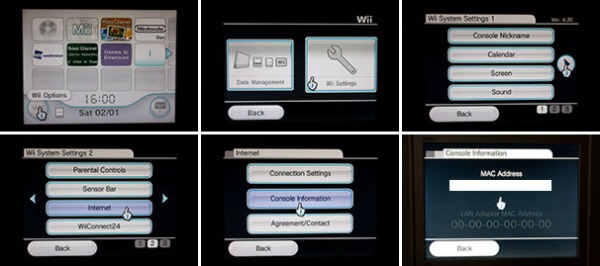
1. Turn your wii on so that the main Wii menu appears.
2. Click the button on the very bottom left called 'Wii Options'
3. Next click 'Wii Settings'.
4. Click the right arrow.
5. Click 'Internet'.
6. Click 'Console Information'
7. This screen shows your MAC address. Right it down if you think you might need it.
2. Click the button on the very bottom left called 'Wii Options'
3. Next click 'Wii Settings'.
4. Click the right arrow.
5. Click 'Internet'.
6. Click 'Console Information'
7. This screen shows your MAC address. Right it down if you think you might need it.
Now you will need to access the settings inside your wireless router.
1. Written beneath your router you will see an address that looks similar to this: http://192.268.0.1
2. Enter this address into a browser on your computer.
3. You might be prompted to enter your name and password.
4. If you or somebody else has already changed your name and password associated with your router, enter these. If you have never done this, then you will need to enter the default name and password that came with the router. Most times these are written on the base of the router also.
5. If you need to check whether your router is compatible with your Nintendo Wii or look up the default name and password associated with your router, you can go to this site: http://www.nintendowifi.com/
6. Select your country and on the next page hover your mouse over the link at the top that reads 'TECH SUPPORT'. A drop-down menu will appear. Click on 'ROUTER INFO'. On this page you can look up the name of your router and see whether it is compatible and what the default name and passwords are on your router.
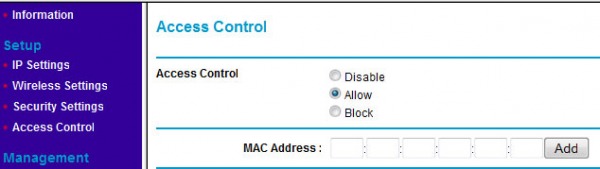
7. Depending on your router, your settings will look different but they all pretty much do the same thing. On my router which is made by Netgear, the access list to enter MAC addresses is located under the heading 'Access Control'. Here is where you will need to enter your Nintendo Wii's MAC address if your router is set up to only allow certain devices.
8. Inside your router's settings you can check to see if you have WEP or WPA enabled. If they are you will need the password or key in order for your Wii to connect to the router.
8. Inside your router's settings you can check to see if you have WEP or WPA enabled. If they are you will need the password or key in order for your Wii to connect to the router.
Connecting To Your Access Point
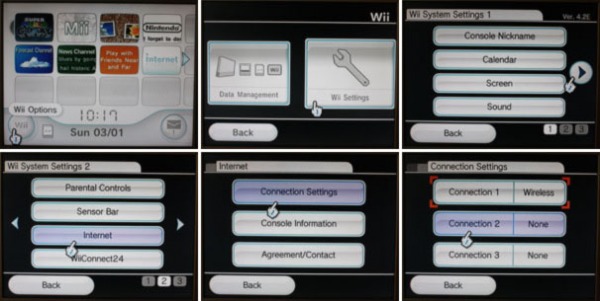
1. Back at the Wii main menu, click the button on the bottom-left.
2. Click on Wii settings.
3. Click on the blue arrow to see the next screen of options and click on the button that says 'Internet'
4. Click 'Connection Settings'
5. Click an open connection. If this is your first time connecting your Wii to the internet, they all should be open and reading 'None'.
2. Click on Wii settings.
3. Click on the blue arrow to see the next screen of options and click on the button that says 'Internet'
4. Click 'Connection Settings'
5. Click an open connection. If this is your first time connecting your Wii to the internet, they all should be open and reading 'None'.
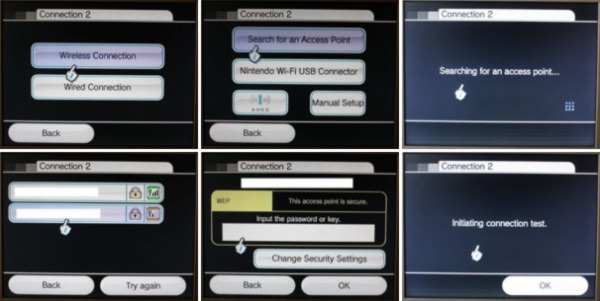
6. Click 'Wireless Connection'.
7. Click 'Search for an access point'.
8. Your Wii will now search for any identifiable access points and present you with a list. Decide which one is yours. If a padlock icon is present after the name of the access point, you will need to enter the password associated with that access point (see WEP, WPA, WPA2 earlier)
9. If the Connection Signal appears yellow or red, then the signal is not optimal. If the signal appears green, then you have a strong connection. If the connection is weak, you could try moving the router and Wii closer together or remove any obstacles that could be blocking the signal.
10. Click 'Save' followed by 'OK' to save your connection settings.
11. Select 'O.K.' to start a connection test.
12. If everything goes according to plan and you are successful then a message will prompt you to update your Wii's software to the latest edition. This should only take a few minutes. If it takes longer than a few minutes, and the progress bar has stopped moving, then you should turn off the system and try the update again (even though the message says not to power the wii off during an update, it's safe to do so if your progress has stopped).
If something went wrong or you cannot connect your wii to the internet. Have a look at this troubleshooting guide. You might need to use the manual settings and change your Wii's settings to 'Static IP'.
Next I will show you how to browse the internet using your wii and how to connect to and enable the Wii shop channel so you can start racking up the points you will need to play Nintendo's collection of retro games onto your wii. Later I will show you how to claim your 500 Free Wii points for connecting your Wii to the internet.
Next I will show you how to browse the internet using your wii and how to connect to and enable the Wii shop channel so you can start racking up the points you will need to play Nintendo's collection of retro games onto your wii. Later I will show you how to claim your 500 Free Wii points for connecting your Wii to the internet.